July 31, 2011

Apple Oat Bars

I went to a family gathering this weekend, and there was no way I was going without a dessert. It took a few minutes' brainstorming, but I knew what I wanted to make: apple oat bars. Maybe it was being around family or maybe it was just a flashback, but when I first bit into one, I was reminded of the muffins with an apple oat topping my aunt used to get for us when we'd come visit. I loved them. I was 12 or so and didn't care much about food, but I couldn't stop raving about them. Then they changed. I knew they came from Costco, but when I finally convinced my parents to pick some up, they had changed somehow. I had almost forgotten about them, until yesterday when I sunk my teeth into these bars. Oh man were they delicious. I'm glad I snagged a piece and hid it away so I could take some pictures when I got back. I used an irregular sized baking dish for these, something like this. You can probably use a 9 by 13, but the bars will be a bit thick.

Ingredients:
  • 10 oz quick oats
  • 15 oz flour
  • 1/2 tsp baking soda
  • 1 tsp salt
  • 1 lb brown sugar
  • 12 oz butter, melted
  • 2 lb granny smith apples, sliced thinly
  • 1 tsp cinnamon
  • 3.5 oz sugar
  • 2 oz butter
Directions:
  1. Preheat the oven to 350 degrees F.
  2. Mix the oats, flour, baking soda, salt, brown sugar, and melted butter into a dough.
  3. Press half of the dough into a baking dish lined with foil.
  4. Toss together the apples, cinnamon, and sugar in a large bowl.
  5. Spread the apples on top of the dough and place little chunks of butter on top of the apples.
  6. Top with the rest of the dough and bake for 30-40 minutes, or until the top is golden brown.
  7. Let cool, refrigerate for 1-2 hours, and turn out and cut.

Enjoy on their own or topped with a scoop of ice cream and caramel sauce.
Share on Tumblr submit to reddit

July 27, 2011

Lemon Sushi

I've always loved a good dinner of albacore and rice pudding. Something about the combo just makes my mouth water. It's never enough just for dinner, though. I always crave more when dessert comes. And now I can satisfy those cravings, with lemon rice pudding and albacore tuna together in tulipe shell for this awesome dessert sushi.

If you're still reading, I'll assume it's in some sort of revolted horror. Relax, relax, this isn't the train-wreck you're dreading. For starters, I don't even eat fish. And if I did, I'm sure I would never touch it again after eating such an... interesting... combo. I couldn't resist starting the post that way, though, since I know something like it was in the back of everyone's mind when they saw the title.

If you have had dessert sushi before, I do it a little differently. A lot of people use fruit leather as a wrapper, since it's a lot like nori, but I like a crunch with my desserts. If you like some crunch, too, eat these soon after you make them. If you wait too long, the shells get soggy, which is no fun for anyone involved.

Ingredients:

  • 2 oz butter
  • 2 oz powdered sugar
  • 2 oz flour
  • 2 oz egg whites
  • 2/3 cup water
  • 1/3 cup short-grain rice
  • .8 fl oz lemon juice
  • 1.4 oz sugar
  • 1/2 tsp lemon zest
  • 4 oz heavy cream
  • 1 tbsp cornstarch
  • 1 tbsp water


Directions:
  1. First, preheat the oven to 400 degrees F.
  2. Melt the butter, then stir in the sugar, followed by the flour. Then add the egg whites and stir until uniform.
  3. Then prepare your stencil. Draw a rectangle of desired sushi roll size on a piece of cardboard and cut it out, saving the outside section.
  4. On a baking sheet lined with parchment, place the stencil down and spoon a bit of batter into the stencil and scrape off the excess with an offset spatula.
  5. Bake for approximately 6 minutes, until they start to get golden brown. When you pull them out, let them cool for 30 seconds to 1 minute. Then peel them from the paper and form them into circles. Small pieces of PVC pipe work awesome, but I also wrap them around an appropriately sized handle or into any other circle I can find. If they get too brittle and start to crack while you're working with them, throw them back in the oven for a minute or two.
  6. While these harden a bit, start the rice pudding. Begin by cooking the rice in the water.
  7. Once the rice is cooked, add it to a saucepan along with all of the other ingredients. Bring to a boil and boil for two minutes.
  8. Fill a piping bag with a large round tip or a coupler only and pipe the rice into the shells.
  9. For added sushi effect, candy strips of lemon peel and insert into the middle of the roll.


Share on Tumblr submit to reddit

July 26, 2011

When we mess up

For a long time before Confectious, I thought about creating a blog showcasing my kitchen disasters with a name like "Uh Oh." The kind of blog people would visit to make themselves feel better. What's that? You accidentally got a bit of yolk into your egg whites for a meringue? That's okay, I saw today on "Uh Oh" that Jacob did the same thing, and set fire to the same towel twice. Something like CakeWrecks, but about me personally. Since then, however, I've had a change of heart (and apparently self-esteem).

As I've been in the kitchen more and more, I've learned to re-purpose my mistakes. And sometimes re-re-purpose them.

Yesterday, I had a plan to make this cute little individual sized layer-cakes. The cakes baked up fine, but the frosting was giving me issues. I've made it plenty of times before, but yesterday it was just off for some reason. So, when I went to frost my cakes and realized my icing was too soft, I thought "No big deal, I'll just make cake pops." Ohh, Jacob, how naive. So when those, too, were runny and soft, I was at a loss. Until inspiration struck. And inspiration only struck because I was torn between making cake and making ice cream. So, I added a bit of cream and milk and pulled out my ice cream maker, Ol' Reliable. I've never yet made anything in it which wasn't tasty. And Ol' Reliable didn't fail me this time either. After 10 minutes or so of churning I had a thick, creamy, somewhat spongy dessert which reminded me of frozen mousse.

Was this dessert exponentially less healthy than ice cream? Yeah, it definitely was. Was it a great way to use what otherwise would have been garbage? Most assuredly. Would I make it again? Yes, if I had the recipe.

And that's why today's post contains no recipe. By that point, I was just hoping to salvage something edible, not something blog-worthy. But I wanted to share my story anyway, to encourage some of you to think outside the box when things go awry. You could come up with something great.

Do you have a kitchen disaster story you'd like to get off your chest? My comments section is always available for (food-related) therapy.
Share on Tumblr submit to reddit

July 23, 2011

Lemon meringue bites

In western Washington, it's rarely very hot. This day, it was. It was the middle of August and dust flew into the air around us. From the pegs of my bike, my friend urged me to ride faster, to leave behind the raspberry farm where we'd worked a long, hard, 2 hour long shift. We liked the job (mostly because we could eat as many raspberries as we picked), but it was hot, we were 12, and the river was calling. Our dust-coated throats begged for mercy as we rode into town, and with cash to fuel our Mountain Dew addictions, we headed toward a Texaco. I peddled sluggishly along, slowed both by the scorching heat and the added weight of my passenger. As I rounded the corner at a snail's pace, a beacon of hope appeared in the guise of a lemonade stand. Mountain Dew could come later. We probably would've settled for a mud puddle by then, if the sun hadn't wiped them all out. I still have no idea what was in the lemonade we got from the boy behind the flimsy fold-out table that day. It could've been Country Time powder for all I know. But it tasted like it was freshly squeezed from lemons grown by angels that day.

As I've grown, I've come to appreciate lemon as a flavor in more than just lemonade. Lemon meringue in particular makes me think of summer, between the lemon and the toasted-marshmallow-esque flavor of meringue. So I decided instead of making a nice 9 inch lemon meringue pie, which would have to be eaten by the slice, with a fork, I'd make bite-sized lemon meringues. Even though I got distracted and left them out of the refrigerator, they were a smashing success.

Makes: 24 lemon meringue bites (mini-muffin size)

Ingredients:

  • 4 graham crackers
  • 3 tbsp butter, melted
  • 2 eggs, separated
  • 4 oz sugar
  • Juice of 2 lemons
  • 4 oz unsalted butter, cold
  • 4 oz sugar


Directions:
  1. First, preheat the oven to 350 degrees.
  2. In a food processor, grind the graham crackers until they form a into crumbs.
  3. Stream in the 3 tablespoons of butter with the food processor running.
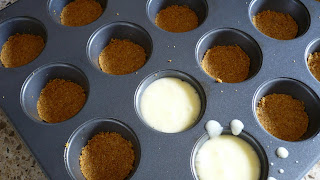
  4. Take approximately half tablespoon sized scoops of graham crust and place them into your preferred pan (I used a mini muffin tin). Then compact the crumbs using some flat object  that is skinny enough to fit in your pan (I used a bottle with the lid on).
  5. Bake this for approximately 5 minutes or until golden brown and set aside to cool.
  6. In a heat-safe bowl oven boiling water, combine two egg yolks, sugar, and the lemon juice, stirring constantly until the temperature reaches 180 degrees.
  7. Remove the egg mixture from the heat and put it into a food processor, letting it cool to 150 degrees.
  8. Turn the food processor on, dropping in pieces of butter until smooth.
  9. Spoon the lemon filling onto the crusts, filling the container roughly 2/3 of the way full.
  10. Freeze this mixture for 1-2 hours.
  11. Remove the bites from the tins using a knife or offset spatula.
  12. Combine the egg whites and sugar oven a double boiler and stir slowly until they reach 140 degrees.
  13. Whip the egg whites and sugar until they reach stiff peaks.
  14. Pipe the meringue onto the bites and brown with a torch.
And that's it.

What flavor reminds you, more than any other, of summer?
Share on Tumblr submit to reddit

July 22, 2011

Brownies 101

I don't love baking for the mouthwatering smell of bread ready to come out of the oven, for the satisfying crunch of perfect macarons, nor even for the finger-licking goodness of freshly made lemon curd. Those are just the benefits. I love baking for the satisfaction of having bread come out with a crackling crust thanks to a recipe all my own; for the feeling I get when I achieve the perfect silky texture of a well-made buttercream. I love baking because I love the feeling of getting that perfect texture and knowing exactly why I got it. The science of baking absolutely fascinates me. It's what keeps me coming back into the kitchen day after day. Is it completely frustrating sometimes (like when you realize that there's really nothing quite like gelatin, which means no gummy bears for your newly vegetarian self)? Yes. But I'm absolutely hooked.

I'll warn you right now. This is going to be a long post.

So let's start by talking about the different characteristics of brownies.

  • Crust: The shiny, crunchy, and paper thin top layer (or lack thereof).
  • Cakey: The airy, slightly more dry and spongey texture in a brownie.
  • Fudgy: The almost gooey, dense texture in a brownie.
  • Soft: A more fall-apart, delicate sort of quality.
  • Firm: When you bite into a firm brownie, you can see your toothmarks plainly. Often super dense.
Seems like a lot, no? But to me, that's awesome. That means that much more choice in my brownie making.

For a Crust:
  • The crust is totally dependent on eggs in your brownie. According again to BakeWise (and you can see this for yourself if you pull some off of your next batch) the shiny crust on top of some brownies is actually a thin layer of meringue. Which means that whether or not your brownies get a crust depends on how much you beat the batter after the eggs are added. That being said, don't feel like you have to beat for 5 or 10 minutes after you add the eggs. All you really need is a minute or so for a great crust.
     
For a Cakey texture:
  • Two main factors determine the cakey-ness (it's my blog, I'll make up adjectives when it suits me) of a brownie: the amount of flour and the use of leaveners.
  • For a cakey texture, the ratio of fat to flour (fat in the form of chocolate and butter) should be somewhere around to 2:1.
  • For a cakey texture, it also helps to use leaveners (i.e. baking powder) like you would in a cake. Remember that 1 tsp of baking powder (or 1/4 tsp of baking soda) leavens 1 cup of flour.
  • To some extent, eggs also make a difference. So use a few eggs for an added cakey texutre.
For a Fudgy texture:
  • The idea here is not to put too much flour into the batter, so that it doesn't form its nice rigid flour structure. The ratio of fat to flour is something like 3:1 or 4:1.
  • Also, (this is related more to the fudgy taste) use flavors that bring out the taste of chocolate more, like espresso, molasses, or brown sugar.
  • Go easy on the eggs.
For Softness:
  • For a soft brownie, butter should be the primary fat. Butter is very soft at room temperature. This doesn't change much after baking. The fat will return to its state of softness at a given temperature. To maintain the chocolatey taste in these brownies, use cocoa powder (but don't factor cocoa powder in with flour when you do your ratio math).
For Firmness:
  • For a firm brownie, chocolate should play a major role as a fat. Chocolate, unlike butter, is hard at room temperature. So after it's baked and brought back to room temperature, a brownie with a lot of chocolate will be firm as well.
And there you have it, everything you need to make your own perfect brownie recipe. Remember to taste as you go, too. Is the batter not quite sweet enough? Add some sugar. Not rich enough? Add another egg. And always a tiny bit of salt. Remember that they're your brownies, and they can taste however you like them. 

Any questions I didn't answer? Any characteristics I forgot?
Share on Tumblr submit to reddit
July 20, 2011

How I created my first brownie recipe - Fudgy brownies with Creme de Cacao buttercream

My fiance is constantly asking for brownies. It's gotten to the point where I don't even bother to ask what she wants me to bake anymore. I think there's been some Pavlovian conditioning somewhere along the line to condition her to crave brownies when she hears the word "bake." Or possibly she's got some sort of rare brownie-related deficiency. Either way, I end up making brownies fairly often. But this time I wanted to do something special. This time I wanted to come up with a brownie recipe all my own. So I hit the books (specifically BakeWise and CookWise) and came up with a recipe of my own. As soon as I peeked into the oven and saw that they did indeed look like brownies, I started cabbage-patching. And don't even get me started on when I tasted them. These are nice and fudgy, my favorite way to eat brownies. I'll be posting a little later in the week about how to come up with your own recipe (what makes them fudgy, chewy, soft, etc), so stay tuned for that too.

Edit: You can now find that post here.


Ingredients:

  • 4 oz dark chocolate, chopped
  • 4 oz butter
  • 3 eggs
  • 1/4 tsp salt
  • 1 cup brown sugar
  • 1/2 cup granulated sugar
  • 1 tbsp molasses
  • 1 tsp vanilla
  • 1/2 tsp espresso powder
  • 1 oz water
  • 3/4 cup AP flour
  • 4 oz butter, softened

  • 3 cups powdered sugar
  • 2 tbsp Creme de Cacao
  • 1 tbsp vanilla extract
  • Chocolate, for decoration (optional)


Directions
  1. First, preheat the oven to 350 F.
  2. Melt the butter and the chocolate in a microwave safe bowl, stir until smooth and uniform.
  3. Microwave the 1 oz of water for 25 seconds, until it starts to boil. Add the espresso powder and stir.
  4. Add the eggs, salt, sugars, molasses, vanilla, and espresso to the chocolate and butter mixture and mix until just combined.
  5. Line an 8 inch by 8 inch baking dish with aluminum foil and spray with nonstick spray. Pour the brownie batter into this dish and bake for approximately 20 minutes, or until a toothpick comes out clean.
  6. Beat the 4 oz of butter on low speed in a mixer and add the powdered sugar gradually.
  7. Add in the creme de cacao and vanilla and beat until light and fluffy, scraping down the bowl often.
  8. Once the brownies are cooled, spread the frosting on top and transfer to the refrigerator for approx 30 minutes.
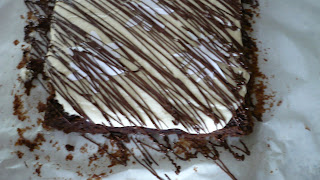
  9. Melt the decorating chocolate and pour it into a parchment cone or decorating bag fitted with a very small round tip.  Remove the brownies from their pan and peel down the foil. In diagonal lines, squeeze chocolate over the brownies. Be sure to continue squeezing past the sides of the brownies and work quickly. Artfully messy is what we're going for here.
  10. Cut the brownies into twelve pieces and enjoy.


What is your favorite kind of  brownie, fudgy or cakey?
Share on Tumblr submit to reddit

July 16, 2011

Molten Cake Monsters

I have something of a cookbook obsession. Probably not like most people, though. I rarely cook from them, and I almost never buy them. I do, however, blitz the stacks at the local library and come out with an armload of cookbooks. I always get smiles from the librarians (I think they're hoping I'll bring the books back with plates of food) and occasionally confused looks when I drop them off two days later. Confession: It usually only takes me a day, but I wait another day to preserve my image. That's a day in the life of my bookshelf. But a book I picked up recently is making an extended stay: Jacques Torres' A Year in Chocolate: 80 Recipes for Holidays and Special Occasions. The first recipe I've baked from this book is Torres's Chocolate Indulgence, known to most of us as molten cake. This recipe was 1) easy and 2) delicious. This literally took 10 minutes (20 with baking time) to make.

I also wanted this dessert to be kind of fun. I know molten cakes are usually a "fancy" dessert, but I've never been one to put desserts on a pedestal. So I decided to turn these cakes into cute little monsters with chocolate features. So without further ado, Jacques Torres's recipe for molten cakes (it makes 4)....

Ingredients:

  • 6 oz bittersweet chocolate
  • 6 tbsp butter
  • 1/4 cup sugar
  • 2 eggs
  • 1 tbsp AP flour
  • Dark and white chocolate (for piping) - probably around 2 oz of each
Directions:
  1. First, preheat the oven to 400 degrees F.
  2. Then combine the chocolate, butter, and sugar in the top of a double boiler and stir until melted and smooth.
  3. The whisk in the eggs and flour.
  4. Pour the batter into four greased ramekins.
  5. Bake for 9-11 minutes, until the center is still wobbly, but the edges are set.
  6. While this bakes, melt your white chocolate in the microwave and prepare a parchment cone.
  7. Pipe rounds roughly the size of a nickel, as shown. Smooth them out with an offset spatula or a spoon, and then smooth down the tips with a wet finger.
  8. Then, melt your dark chocolate and prepare another piping bag.
  9. First pipe little eyeballs onto your white chocolate disks, then begin piping arms. I like to make a few passes for each section of the arms, then a pass back and forth for each of the fingers. Don't worry if they don't look perfect. It'll just lend them a more monstrous quality. Pipe 4 sets of arms.
  10. Then, with your leftover chocolate, you can pipe little horns, mustaches, etc.
  11. When the cakes come out of the oven, you've got to work fast to assemble them. Mostly because they're delicious when they're warm, but also because as soon as your chocolate appendages touch the cake, they'll start to melt. Once the ramekins are cooled a bit, but still warm, run a knife around the edges and turn the cakes out onto small plates. Stick the arms on and attach the eyes with a bit of your chocolate (or just rest them against the cake) and dig in.


Do you have any cookbooks you're big on currently? 
Share on Tumblr submit to reddit

July 13, 2011

Peanut Butter Jelly Cupcakes

Sometimes I bake late at night. As anyone who has ever seen Michael Jackson's "Thriller" music video can tell you, weird stuff happens at night. And weird, in baking, can be a good thing.

Maybe some of you have seen the website Bake It in a Cake. If you haven't, stop reading now and go check it out. Some of the cupcakes on that site had me in stitches. I mean, baklava inside a cupcake? I'm totally obsessed with the concept. I'm even thinking of making it a weekly feature on the blog. But the first one I ever tried to make for myself was peanut butter and jelly sandwich filled cupcakes. This was possibly a mistake, if only for the fact that I'm now hopelessly addicted. I like to make mine with white cake and a buttercream flavored with jelly. Otherwise I think the peanut butter overpowers the jelly. So without further ado, the recipe.

Makes: 10-12 cupcakes

Ingredients:

  • 4 slices of bread
  • Peanut Butter
  • Jelly
  • 1 1/2 cups AP flour
  • 1 3/4 tsp baking powder
  • 1/4 tsp salt
  • 1/3 cup butter, softened
  • 3/4 cup granulated sugar
  • 1 egg
  • 1/2 tsp vanilla extract
  • 3/4 cup sour cream
  • 4 oz butter, softened
  • 2 2/3 cup powdered sugar
  • 3 tbsp of your favorite jam or jelly(I like raspberry or grape)

Directions:
  1. Make two peanut butter and jelly sandwiches and cut them into rounds, roughly the size of your muffin tins.
  2. Preheat the oven to 350 F.
  3. Whisk together the flour, baking powder, and salt.
  4. Cream the 1/3 cup butter with the granulated sugar until light and fluffy, scraping down the sides occasionally.
  5. Beat the egg in thoroughly, scraping down the sides once.
  6. Add the vanilla.
  7. Mix the sour cream and the dry ingredients into the butter mixture, alternating.
  8. Spoon a small amount of the batter into your prepared muffin tins. Top that bit with a round of sandwich, and fill the tin the rest of the way up with batter.
  9. Bake for 12-15 minutes, until a toothpick comes clean out of the cake section.
  10. Next, beat the 4 oz of butter and the powdered sugar together until light and fluffy. Add the jam and a bit of water, if needed. Pipe this buttercream onto your cooled cupcakes and enjoy.

P.S. It's been so awesome to see so many comments and views this past month, as well as to see my photos on people's tumbler pages. You guys and gals are amazing!

P.P.S. If you haven't checked out the shop tab, I urge you to head on over and let me know what you think! New stuff is going in all the time. Anything you'd like to see?

Totally unrelated question: When you visit food blogs, do you like to see content in addition to recipes, or just recipes?
Share on Tumblr submit to reddit

July 10, 2011

Homemade Ice Cream Sundaes

Before this afternoon, I hadn't had an ice cream sundae in over 5 years. I don't think I'll ever make that mistake again. There's just something about vanilla ice cream with chocolate syrup that's much more magical than chocolate ice cream. Although maybe I should try chocolate ice cream with vanilla sauce... Anyway, back to this week's ice cream. If you don't have vanilla beans, nor access to them, 3 tbsp of vanilla extract will work alright, but the vanilla bean is worth the effort too.

Oh, and I've just launched a new page on the site called Shop. Lots of new stuff should be coming soon, but go over and check it out if you'd like. I'd sure appreciate it. And please feel free to shoot me an email and let me know what you'd like to see in there. Now, on to the recipe. The ice cream is of my own creation and the dark chocolate syrup recipe is from On Baking, by Sarah Labensky et al.

Ingredients:

  • 2.5 cups heavy cream
  • 2 vanilla beans
  • 3 egg yolks
  • 3 oz sugar
  • pinch salt
  • 2 oz cocoa powder
  • 12 oz water
  • 8 oz sugar
  • 3 oz butter
  • 1 oz heavy cream


Directions:
  1. First, bring the 2.5 cups of heavy cream and the vanilla beans to a simmer in a saucepan and steep for 20 minutes.
  2. Whisk together the egg yolks, sugar, and salt.
  3. Temper the egg yolks into the cream by whisking them with a bit of hot cream and then stirring that back into the rest of the cream.
  4. Heat this, stirring often, until it thickens slightly. Or cook to 170 degrees if you want to use a thermometer.
  5. Chill this mixture and pour it into your ice cream maker.
  6. While this chills, mix together the cocoa powder and enough water to make a paste.
  7. Combine the rest of water and the sugar in a saucepan and heat to a boil.
  8. Then whisk in the cocoa paste and simmer, stirring occasionally, for 15-20 minutes.
  9. Remove the syrup from the heat and stir in the butter and the heavy cream until melted and uniform.
  10. Once everything is made,  top the ice cream with syrup, chopped nuts, cherries, or whatever else you like.

What's your favorite sundae topping?
Share on Tumblr submit to reddit

July 8, 2011

Almond Clafoutis

Having a big bag of fresh cherries presented quite the dilemma today. There were just so many different things which sounded delicious. Cherry ice cream? Black forest torte? Cherry jellies? Recipe after recipe fluttered into my mind. But in the end, the idea for a clafoutis dropped in like a piano in an old cartoon, lodging itself firmly in my thoughts. So I caved. Not that that's a bad thing. But I still have more cherries, so maybe some of those other ideas will come to fruition. Yup, fruition.

Ingredients:

  • 2 cups heavy cream
  • 4 egg yolks
  • 1/2 cup flour
  • 1/4 cup sugar
  • pinch salt
  • 1/2 cup sliced almonds
  • 1.5 cups cherries, stemmed and pitted


Directions:
  1. First, preheat the oven to 350 degrees. Then combine the flour, sugar, yolks, and salt. Whisk until well blended. Then whisk this into the heavy cream.
  2. Pour this mixture into a 9 inch pan and place the cherries into the pan.
  3. Sprinkle the almonds on top of the mixture and bake for approximately 20 minutes, until the custard is set.
  4. Once cooled, dust with powdered sugar and devour.

Pretty simple, huh?
What's your favorite easy summertime dessert?

Check out other great desserts at http://sweet-as-sugar-cookies.blogspot.com/2011/07/sweets-for-saturday-25.html
Share on Tumblr submit to reddit

July 6, 2011

Spicy Chocolate Macarons

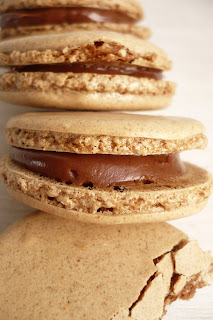
It was hot here today. Probably too hot to bake. But the idea for these struck and I had to. I just had to. I don't have too much to say on them (I've never been big on lengthy, romantic prose about food) except that they're a bit spicy and more than a bit delicious.

Oh, and exciting news coming up soon!

Makes approximately 1 dozen macarons

Ingredients:

  • 2 egg whites, room temperature
  • 3 oz granulated sugar
  • 3 oz almond flour
  • 3 oz powdered sugar
  • 2 tsp cocoa powder
  • 1 tsp cinnamon
  • 1/4 tsp cayenne pepper
  • 1/2 cup of your favorite chocolate frosting
  • 1/2 tsp orange zest

Directions:
  1. Start off by sifting together the almond flour, powdered sugar, cocoa, cinnamon, and cayenne pepper.
  2. Then, whip the egg whites, adding the sugar slowly, until they form medium-stiff peaks.
  3. Mix 1/3 of your egg whites into the flour mixture, then add that back to the egg whites.
  4. Fold these together. This is the tricky part of macarons. To get the perfect consistency, drop a bit of batter onto your counter after every few folds. The peak where the batter fell off of the spatula should remain visible for a bit, but eventually sink into the rest of the batter, leaving a smooth shell. If your batter is over-mixed, it will sink within a second or two and your shell will spread quite a bit. There's a great tutorial on macarons over at Not So Humble Pie. Be sure to leave a lot more room  between macarons than you think you'll need, just in case, and remember to test the batter as you go.
  5. Load the batter into a piping bag and pipe small rounds onto a parchment lined sheet pan. How big is up to you, but for uniformity you can trace a round object onto the parchment paper before turning it over to pipe on. When you're finished piping, rap the sheet pan on your counter a few times, to get rid of air bubbles in the shells.
  6. Let these sit out for approximately 30 minutes so that they have time to develop a hard skin on top. This is what gives the macarons their characteristic "feet". If it's a particularly hot day, you can aim a fan at them to speed the process up. While this is going on, preheat the oven to 325 degrees.
  7. After they've developed hard tops, bake the macarons for about 10 minutes. You'll be able to tell when they're done by peeling them from the parchment. If they peel off, they're ready.
  8. After the macarons have cooled, mix together 1/2 cup of your favorite chocolate frosting and 1/2 tsp of orange zest. Pipe this into the center of a macaron shell and stick another shell to it, pressing until the frosting spreads.

I often have the following debate with myself: Are rich, chocolaty macarons, or refreshing, fruity macarons better? Today rich won. Which is your pick?
Share on Tumblr submit to reddit